
Hashicorp Vault (Vault) is an open-source tool for managing secrets. This blog post will demonstrate how to use Vault to generate a root CA for trusted TLS communication and how to generate client certificates for mutual TLS communication. Not only does this blog post contain a high-level overview of Vault, it includes working infrastructure-as-code and step-by-step tutorial.
Goals
- Run Hashicorp Vault (Vault) on Docker
- Initialize Vault
- Generate root CA
- Generate intermediate certificate signed by CA
- Import root CA into the Firefox browser
- Generate a client certificate
- Import client certificate into the Firefox browser
DISCLAIMER
This blog post is a proof of concept (POC) for a homelab and does NOT implement best practices for an enterprise environment. Please review the Hashicorp Vault documentation for best practices. In addition, this POC will be setting up a single Vault and Consul instance which does not provide high-availability.
DISCLAIMER
Background
What is Vault
HashiCorp Vault is an open source tool for managing secrets. Application identity management with Vault enables applications and machines to automatically create, change, and rotate secrets needed for communications, services, scripts, etc. Additionally, Vault enables administrators to manage applications and machines by providing access control over different secrets.
- Roles – Roles are created to assign the capabilities a certificate has such as time to live (TTL), extensions, specify users, and CIDR blocks.
- Policies – Policies provide a declarative way to grant or forbid access to certain paths and operations in Vault.
- Auth methods – Auth methods are the components in Vault that perform authentication and are responsible for assigning identity and a set of policies to a user.
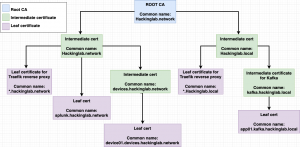
- Chain of trust – Certificate hierarchy, a subordinate Intermediate CA certificate will be issued by the Root CA to issue an end-entity SSL certificate. This creates a chain of trust that begins at the Root CA, through the Intermediate CA and ending with the SSL certificate.
- Root CA – Root CA’s are implicitly trusted by web browsers and applications.
- Intermediate certificate – An intermediate CA certificate is a subordinate certificate issued by the trusted root specifically to issue end-entity server certificates. The result is a trust-chain that begins at the trusted root CA, through the intermediate and finally ending with a leaf certificate.
- Leaf certificate – A “leaf certificate” is what is more commonly known as an end-entity certificate. Certificates come in chains, starting with the root CA, each certificate being the CA which issued (signed) the next one. The last certificate is the non-CA certificate which contains the public key you actually want to use.
Trust models
Certificates have a hierarchy (diagram below) which is the root CA, intermediate cert(s), and leaf nodes/certs. Typically, you generate a root CA, generate an intermediate cert based on the root CA, and store the root CA in a super safe location (airgapped). The intermediate certificate generated from the root CA is used for all future actions pertaining to certificate generation and revocation.
Common questions I was asking during this project was “How do you know when to generate intermediate?” or “How does one do segmentation?”. The rule of thumb for generating intermediate certificates is creating them based on your trust model – how you want to do segmentation. In my homelab, I have a production and development network and my trust model/segmentation is targeted at these networks. In an enterprise, you would typically create a trust model/segmentation between different business units like DevOps, Finance, Human resources, security, etc. Another example is how you do segmentation in Active Directory. You don’t place all the users in the root of the domain, you create groups and place users into those groups. You can think of intermediate certificates as those Active Directory groups.
Create ROOT CA with Vault + Docker
Step 0: Spin up Vault stack
git clone https://github.com/CptOfEvilMinions/BlogProjectscd BlogProjects/Docker-vaultdocker-compose build
docker-compose up -d
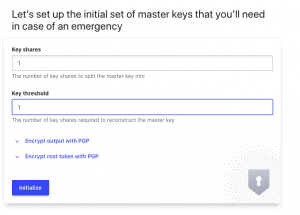
Step 1: Init Vault
- Open browser to
http://<Docker IP addr>:8200- Enter
1for Key Shares- NEVER EVER ENTER 1 FOR PRODUCTION – Only enter 1 for testing
- Enter
1for Key threshold- NEVER EVER ENTER 1 FOR PRODUCTION – Only enter 1 for testing
- Select Initialize
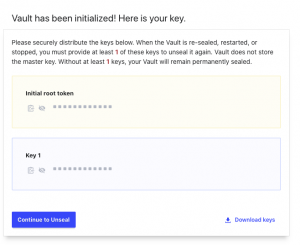
- Enter
- Select “Download keys”
- Open terminal
cat ~/Downloads/vault-cluster-vault-*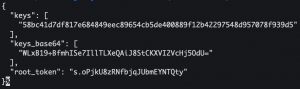
- Back to browser
- Select “Continue to Unseal”
- Enter “<key from downloaded file>” into Master Key Portion
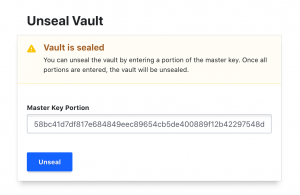
- Select “Unseal”
- Select “Token” for method
- Enter “<root_token from downloaded file>” into sign in
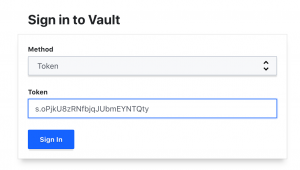
- Select “Sign In”
Step 3: Install Vault CLI tool on macOS
For other OSes please visit this page
brew tap hashicorp/tap- Add the HashiCorp tap, a repository of all our Homebrew packages.
brew install hashicorp/tap/vault- Install Vault
brew install jq- Install
jqwhich is a command-line tool for interacting with JSON
- Install
Step 3: Login into Vault
export VAULT_ADDR=https://<Docker IP addr>:8200vault login- Enter root_token from step 1
Step 4: Generate root CA
vault secrets enable pki- Enable the PKI engine
vault secrets tune -max-lease-ttl=87600h pki- Tune the pki secrets engine to issue certificates with a maximum time-to-live (TTL) of 87600 hours
- 87600 hours = 3650 days = 10 years
vault write -field=certificate pki/root/generate/internal common_name="<domain>" ttl=87600h > CA_cert.crt- Generate a self-signed root certificate using the PKI secrets engine and write the public certificate to disk
vault write pki/config/urls issuing_certificates="http://127.0.0.1:8200/v1/pki/ca" crl_distribution_points="http://127.0.0.1:8200/v1/pki/crl"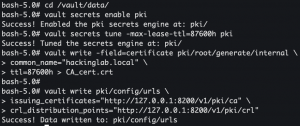
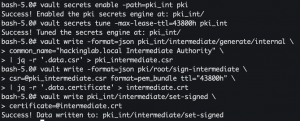
Step 5: Generate intermediate CA
vault secrets enable -path=pki_int pki- Enable the pki secrets engine at the
pki_intpath
- Enable the pki secrets engine at the
vault secrets tune -max-lease-ttl=43800h pki_int- Tune the pki_int secrets engine to issue certificates with a maximum time-to-live (TTL) of 43800 hours
- 43800 hours = 5 years
vault write -format=json pki_int/intermediate/generate/internal common_name="<domain> Intermediate Authority" | jq -r '.data.csr' > pki_intermediate.csr- Generate an intermediate certificate and save the certificate signing request (CSR) to disk
vault write -format=json pki/root/sign-intermediate csr=@pki_intermediate.csr format=pem_bundle ttl="43800h" | jq -r '.data.certificate' > intermediate.crt- Sign the intermediate certificate with the root certificate and write the generated certificate to disk
vault write pki_int/intermediate/set-signed [email protected]- Import the signed certificate by the ROOT CA into Vault
- Import the signed certificate by the ROOT CA into Vault
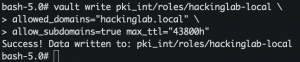
Step 6: Create a role
vault write pki_int/roles/<domain> allowed_domains="<domain>" allow_subdomains=true max_ttl="8760h"- Create a role that allows certificates for subdomains to be generated
- Create a role that allows certificates for subdomains to be generated
Step 7: Request a leaf certificate
vault write -format=json pki_int/issue/<domain> common_name="*.<domain>" ttl="8760h" > wildcard_<domain>.json- Request a new wildcard certificate for the domain specified above
- 8760 hours = 1 year

cat wildcard_<domain>.json | jq -r '.data.private_key' > wildcard_<domain>.pem- Extract private key from JSON blob
cat wildcard_<domain>.json | jq -r '.data.certificate' > wildcard_<domain>.crtcat wildcard_<domain>.json | jq -r '.data.ca_chain[]' >> wildcard_<domain>.crt- Extract public certificate chain from JSON blob
rm wildcard_<domain>.json
Step up 8: Write Vault cert data to disk
cat CA_cert.crt- Copy root CA certificate
cat wildcard_hackinglab_local.pem- Copy private key
cat wildcard_hackinglab_local.crt- Copy public certificate
- Open a new terminal tab
cd BlogProjects/Docker-vault- Paste root CA output:
echo "<CA_cert.crt ouput>" > conf/tls/root_ca/CA_cert.crt - Paste wildcard_hackinglab_local.pem output:
echo "<wildcard_hackinglab_local.pem ouput>" > conf/tls/signed_cert/wildcard_<domain>.pem - Paste wildcard_hackinglab_local.crt output:
echo "<wildcard_hackinglab_local.ccrt ouput>" > conf/tls/signed_cert/wildcard_<domain>.crt
Step 9: Install ROOT CA on Firefox
- Open Firefox
- Settings > Preferences > Privacy & Security > Certificates
- Select “View certificates”
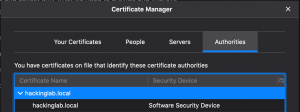
- Select the “Authorities” tab
- Select “Import”
- Import
BlogProjects/Docker-vault/conf/tls/root_ca/CA_cert.crt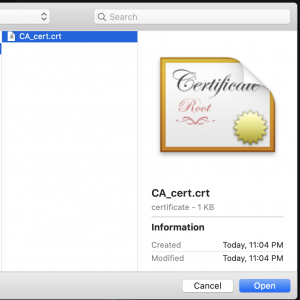
- Select “Open”
- Select “Trust this CA to identify websites”
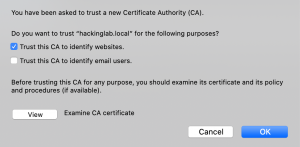
- Select “Trust this CA to identify websites”
Step 10: Spin up NGINX stack
docker-compose -f docker-compose-signed-cert.yml builddocker-compose -f docker-compose-signed-cert.yml up- Open a browser to https://<Docker IP addr>:8443
Generating Device/machine/client certificates
Step 1: Generate an intermediate certificate
- Back to vault terminal
vault secrets enable -path=devices_<domain>_pki_int pki- Enable the pki secrets engine at the
devices_<domain>_pki_intpki path.
- Enable the pki secrets engine at the
vault secrets tune -max-lease-ttl=26280h devices_<domain>_pki_int/- Tune the PKI secrets engine to issue certificates with a maximum time-to-live (TTL) of 26280 hours.
- 26280 hours = 3 years
vault write -format=json devices_<domain>_pki_int/intermediate/generate/internal common_name="devices.<domain> Intermediate Authority" | jq -r '.data.csr' > devices_<domain>_pki_int.csr- Generate an intermediate certificate and save the certificate signing request (CSR) to disk

- Generate an intermediate certificate and save the certificate signing request (CSR) to disk
vault write -format=json pki/root/sign-intermediate csr=@devices_<domain>_pki_int.csr format=pem_bundle ttl="26280h" | jq -r '.data.certificate' > devices_<domain>_int.crt- Sign the device intermediate certificate (devices.hackinglab.local) with the intermediate certificate (hackinglab.local) and write the generated certificate to disk
vault write devices_<domain>_pki_int/intermediate/set-signed certificate=@devices_<domain>_int.crt- Import the signed certificate by the intermediate certificate into Vault
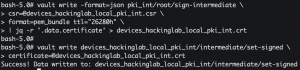
- Import the signed certificate by the intermediate certificate into Vault
Step 2: Create a role
vault write devices_<domain>_pki_int/roles/devices-<domain> allowed_domains="devices.<domain>" allow_subdomains=true max_ttl="26280h"- Create a role that allows client certificates to be generated

- Create a role that allows client certificates to be generated
Step 3: Generate a client certificate
vault write -format=json devices_<domain>_pki_int/issue/devices-<domain> common_name="<hostname>.devices.<domain>" ttl="26280h" > <hostname>_devices_<domain>.json- Request a new wildcard certificate for the domain specified above
- 26280 hours = 3 years
cat <hostname>.devices.<domain>.json | jq -r '.data.private_key' > <hostname>.devices.<domain>.pem- Extract private key from JSON blob
cat <hostname>.devices.<domain>.json | jq -r '.data.certificate' > <hostname>.devices.<domain>.crtcat <hostname>.devices.<domain>.json | jq -r '.data.ca_chain[]' >> <hostname>.devices.<domain>.crt- Extract public certificate from JSON blob
rm <hostname>.devices.<domain>.json
Step 4: Write Vault cert data to disk
cat devices.<domain>.crt- Copy public certificate
- Open a new terminal tab
cd BlogProjects/Docker-vault- Paste devices.<domain>.crt output:
echo "devices.<domain>.crt ouput>" > conf/tls/mutual_tls/devices.<domain>.pem
Step 5: Convert PEM format certificate to PKSC12
- Back to Vault terminal
cat <hostname>.devices.<domain>.crt- Copy public certificate
cat <hostname>.devices.<domain>.pem- Copy private key
- Switch back to the other terminal tab
echo "< <hostname>.devices.<domain>.crt output >" > conf/tls/client_cert/<hostname>.devices.<domain>.crtecho "< <hostname>.devices.<domain>.pem output >" > conf/tls/client_cert/<hostname>.devices.<domain>.pemopenssl pkcs12 -export -out ~/Desktop/<hostname>.devices.<domain>.p12 -inkey conf/tls/client_cert/<hostname>.devices.<domain>.pem -in conf/tls/client_cert/<hostname>.devices.<domain>.crt -certfile conf/tls/root_ca/CA_cert.crt- Enter an export password

- Enter an export password
Step 6: Spin up NGINX stack with mutual TLS
docker-compose -f docker-compose-mutal-tls.yml builddocker-compose -f docker-compose-mutal-tls.yml up
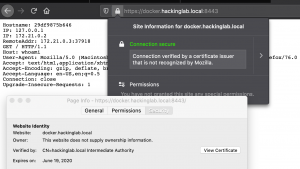
Step 7: Browse to the site
- Open Firefox browser to https://<Docker IP addr>:8443
Step 8: Import PKSC12 client cert into Firefox
- Open Firefox
- Settings > Preferences > Privacy & Security > Certificates
- Select “View certificates”
- Select “Your certificates” tab
- Select Import
- Import <hostname>.devices.<domain>.p12
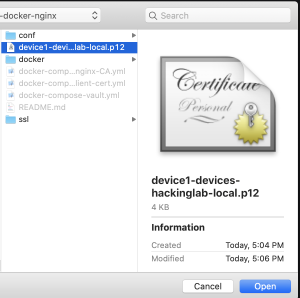
- Select open
- Enter the export password from above

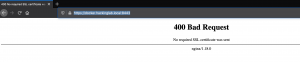
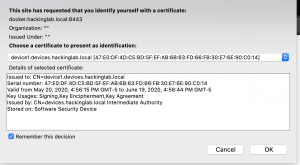
Step 9: Browse to the site
- Open the Firefox browser to https://<Docker IP addr>:8443
- Firefox will request you to select your identity

Lessons learned
I am currently reading a book called “Cracking the Coding Interview” and it is a great book. One interesting part of the book is their matrix to describe projects you worked on and the matrix contains the following sections which are: challenges, mistakes/failures, enjoyed, leadership, conflicts, and what would you do differently. I am going to try and use this model at the end of my blog posts to summarize and reflect on the things I learn. I don’t blog to post things that I know, I blog to learn new things and to share the knowledge of my security research.
New skills/knowledge
- Learned Hashicorp Vault
- Learned how the chain of trust works with certificates
- Learned how mutual TLS works and is implemented
Challenges
- Was not able to find best practices documents and tutorials
- Learning the terminology
What You’d Do Differently
- Not use the root account to perform the activities done above
- Enable LDAP auth
References
- Build Your Own Certificate Authority (CA)
- Managing Secrets with Vault and Consul
- Vault delete
- Vault auth enable
- DockerHub – containous/whoami
- X.509 Certificate Management with Vault
- Create a client certificate using your CA certificate
- HashiCorp Vault and TLS Certificate Authentication for .NET Applications (Comprehensive guide)
- Create the root pair
- YouTube – Streamline Certificate Management
- SECURING WEBSITES WITH NGINX AND CLIENT-SIDE CERTIFICATE AUTHENTICATION ON LINUX
- How To View A Password Behind The Asterisks In a Browser
- Vault | Free Vectors, Stock Photos & PSD
- Install Vault
Hi, I am getting stuck on generating the Int cert due to lack of “jq” in the container. This is the command that is failing
vault write -format=json devices__pki_int/intermediate/generate/internal common_name=”devices. Intermediate Authority” | jq -r ‘.data.csr’ > devices__pki_int.csr
Hey CES,
Please install jq within your Docker container with the following command: “apk add jq”. Additionally, please take a look at my updated post to login into Vault with the CLI tool instead of the container command line.