Detection engineering teams are increasingly adopting data warehouses for their ability to handle massive data volumes, capabilities that traditional SIEM technologies often lack. Because data warehouses already power many organizations’ big-data needs, security teams can leverage the same platforms the business uses and gain access to valuable business data, such as application-based logs, for detection purposes. This approach brings security closer to the business by eliminating data silos and disparate toolsets, streamlining detection teams so they can focus on building detections rather than managing logging pipelines.
This blog post walks you through creating the resources, manually or with Terraform, to ingest the DC30 Project Obsidian dataset (produced by Blue Team Village) into Databricks. Using the Databricks Medallion Architecture, we’ll load raw logs from S3 into bronze tables and then normalize them to create silver tables. This post serves as a primer for future articles that will demonstrate how to leverage Databricks for detection engineering.
Goals
- Store raw logs in an AWS S3 bucket
- Ingest raw logs from S3 into a Delta table
- Query Delta tables
Requirements
- AWS account
- Create Databricks Community Edition account
Background
What is Databricks?
Databricks is a unified, open analytics platform for building, deploying, sharing, and maintaining enterprise-grade data, analytics, and AI solutions at scale. The Databricks Data Intelligence Platform integrates with cloud storage and security in your cloud account, and manages and deploys cloud infrastructure for you.
What are Delta tables?
Delta tables, built on Delta Lake, are a storage layer that brings reliability, performance, and manageability to data lakes. They enhance traditional data lake capabilities by providing features like ACID transactions, schema enforcement, time travel, and optimized performance. Delta tables store data as a directory of files in cloud object storage and register table metadata to a metastore.
What is the medallion architecture?
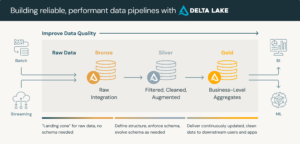
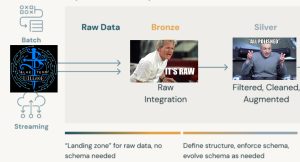
A medallion architecture is a data design pattern used to logically organize data in a lakehouse, with the goal of incrementally and progressively improving the structure and quality of data as it flows through each layer of the architecture (from Bronze ⇒ Silver ⇒ Gold layer tables). Medallion architectures are sometimes also referred to as “multi-hop” architectures.
Bronze layer (raw data)

The Bronze layer is where we land all the data from external source systems. The table structures in this layer correspond to the source system table structures “as-is,” along with any additional metadata columns that capture the load date/time, process ID, etc. The focus in this layer is quick Change Data Capture and the ability to provide an historical archive of source (cold storage), data lineage, audibility, reprocessing if needed without rereading the data from the source system. For our scenario, we will store the raw logs as JSON files in an S3 bucket and ingest them “as-is”,
Silver layer (cleansed and conformed data)

In the Silver layer of the lakehouse, the data from the Bronze layer is matched, merged, conformed and cleansed (“just-enough”) so that the Silver layer can provide an “Enterprise view” of all its key business entities, concepts and transactions. (e.g. master customers, stores, non-duplicated transactions and cross-reference tables). In this post, you’ll create Delta tables from raw data at this layer.
Gold

In a future blog post, I’ll demonstrate how to use Databricks, SQLAlchemy, and ChatGPT to normalize logs using the Splunk Common Information Model (CIM). I will note the code for this blog post does include the necessary SQL states to create gold tables mapped to Splunk CIM.
Init
Prepare logs
git clone https://github.com/CptOfEvilMinions/BlogProjectscd BlogProjects/databricks-btv-dc30chmod +x ./scripts/prepare-logs.sh- Download the DC30 Project Obsidian dataset
- Download the DC30 Project Obsidian dataset
- The file structure should look like this:
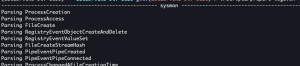
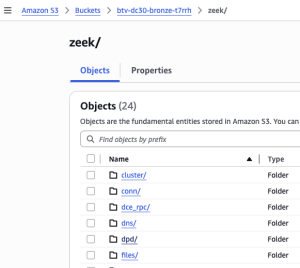
➜  tree logs/
.
logs
├── hmail
│   └── hmail.log
├── osquery
│   ├── cpu_time
│   │   └── osquery.log
│   ├── iptables
│   │   └── osquery.log
│   ├── memory_info
│   │   └── osquery.log
...
├── sysmon
│   ├── ClipboardChange
│   │   └── sysmon.log
│   ├── CreateRemoteThread
│   │   └── sysmon.log
│   ├── DnsEventDnsQuery
│   │   └── sysmon.log
...
├── wineventlogs
│   ├── 0
│   │   └── wineventlogs.log
│   ├── 1
│   │   └── wineventlogs.log
│   ├── 1000
│   │   └── wineventlogs.log
│   ├── 10000
│   │   └── wineventlogs.log
│   ├── 10001
│   │   └── wineventlogs.log
│   ├── 10005
│   │   └── wineventlogs.log
│   ├── 1001
│   │   └── wineventlogs.log
...
└── zeek
├── broker
│   └── zeek.log
├── capture_loss
│   └── zeek.log
├── cluster
│   └── zeek.log
├── conn
│   └── zeek.log
AWS manual setup
Phase 1: Initialize AWS S3 bucket with logs
Note: S3 bucket names must be globally unique across all AWS customers. To avoid conflicts, append a random suffix to your bucket name to avoid conflicts.
- Log in to the AWS console
- Services > S3
- Click “Create bucket” in top right
- Enter bucket name, format
btv-dc30-bronze-<random suffix>- I like to append a random suffix to avoid naming conflicts
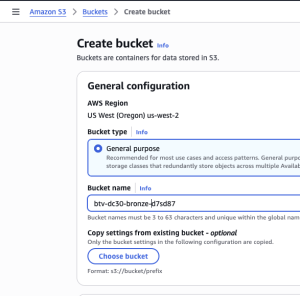
- I like to append a random suffix to avoid naming conflicts
- I kept all settings as the default
- Select “Create bucket” at the bottom
- Enter bucket name, format
- Enter the newly created bucket
- Upload the logs to the bucket
- Select “Upload” in the top right
- Select “Add folders”
- Upload the following directories:
hmail,osquery,sysmon,wineventlogs, andzeek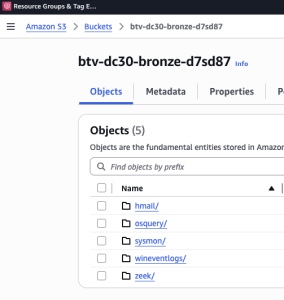
Phase 2: IAM
To let Databricks Unity Catalog access S3, you create an AWS IAM role with a trust policy. First, create the role with a placeholder trust relationship, then register it in Databricks as a storage credential, which gives you an External ID. Next, update the IAM role’s trust policy so it can self-assume and so it uses that External ID. Finally, validate the credential in Databricks and, if needed, restrict it to certain workspaces.
Step 1: Create role
- Services > IAM > Roles
- Select “Create role”
- Select “Custom trust policy” for “Trusted Entity”
- Copy the JSON policy from the link provided above or Appendix: AWS IAM trust policy for Databricks roles and paste it into policy editor
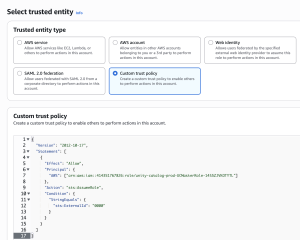
- Select “Next”
- Copy the JSON policy from the link provided above or Appendix: AWS IAM trust policy for Databricks roles and paste it into policy editor
- Add permissions
- Skip the permissions policy configuration
- Name, review, and create
- Enter
btv-dc30-databricksfor role name - Select “Create role”
- Enter
- Select “Custom trust policy” for “Trusted Entity”
Step 2: Create and append policy to role
Note: The following policy is simplified for tutorial purposes and should not be used in production without additional security hardening.
- Services > IAM > Policies
- Select “Create policy”
- Specify permissions
- Select “JSON” tab for editor
- Copy the JSON policy payload from the Databricks tutorial linked above or Appendix: AWS IAM policy for Databricks roles
- Replace
<BUCKET>with the bronze and silver buckets created above - Replace
<AWS-ACCOUNT-ID>with YOUR AWS account ID - Replace
<AWS-IAM-ROLE-NAME>with the name of newly IAM role
- Replace
- Select “Next”
- Review and create
- Enter
btv-dc30-databricksfor policy name - Select “Create policy”
- Enter
- Specify permissions
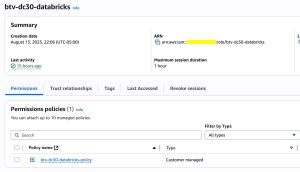
- IAM > Roles > btv-dc30-databricks > Permissions
- Append the newly created policy to the role
Databricks manual setup
Phase 1: Create storage credentials
In Databricks, a Storage Credential is essentially a secure way to let Databricks access external cloud storage (like AWS S3, Azure Data Lake Storage, or GCP Cloud Storage) without exposing your raw credentials in notebooks or jobs. Think of it as a token or key manager for your external storage.
- Select “Catalog” on the left
- Select “+” > Create a credential
- Select “Storage Credential”
- Select “AWS IAM Role” for “Credential Type”
- Enter
btv-dc30for “Credential name” - Enter ARN for the IAM role created above
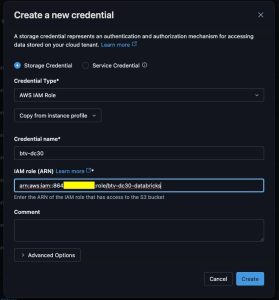
- Select “Create”
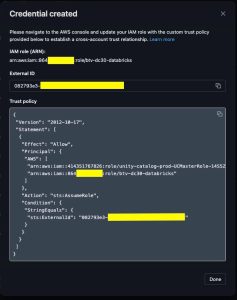
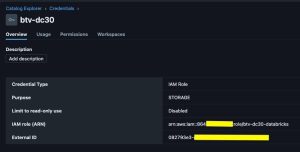
- Copy External ID
- Select “Storage Credential”
Phase 2: Update IAM role
- Copy the external ID
- AWS > IAM > btv-dc30-databricks > Trust Relationship
- Update
sts:ExternalIdfrom0000to<external_id>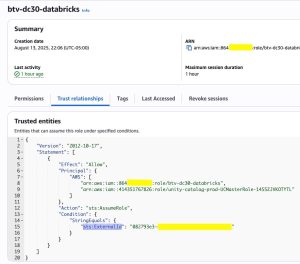
Phase 3: Create external locations
In Databricks, an External Location is essentially a reference to storage outside of Databricks itself (like S3, ADLS, or GCS) that Unity Catalog or Databricks SQL can access, usually with fine-grained permissions. It acts as a managed pointer to external cloud storage, so you can enforce security, governance, and access controls on the data you read or write.
- Select “Catalog” on the left
- Select “+” > Create an external location
- Select “Manual”
- Create a new external location manually
- Enter
btv-dc30-bronzeas external location name - Select
S3for storage type - Enter
s3://btv-dc30-bronze-<random suffix>for URL - Select the storage credential created in the previous step
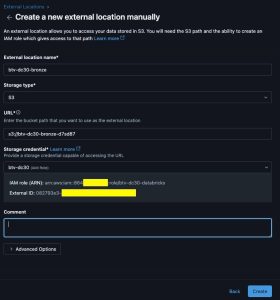
- Repeat for silver
- Enter
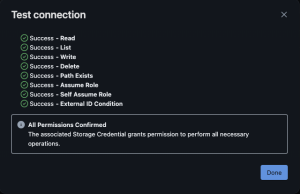
- Select “Test connection” in the top right
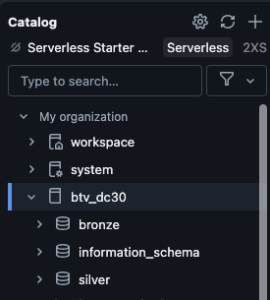
Phase 4: Create catalog
In Databricks, a Catalog is a top-level container for data in Unity Catalog that organizes your schemas (databases) and tables. It’s like the root namespace for your data assets, helping you manage, govern, and secure access across your workspace.
- Select “Catalog” on the left
- Select “+” > Create a catalog
- Enter
btv_dc30into catalog name - UNcheck “Use default storage”
- Select “btv-dc30-silver” for storage location

- Select “Create”

- Enter
Phase 5: Create schemas
In Databricks, a Schema (also called a Database) is a logical container within a Catalog that organizes tables, views, and other data objects. It’s one level below a Catalog in the Unity Catalog hierarchy.
- Using the newly create catalog, select “Create schema”
- Enter
bronzefor schema name - Select
btv-dc30-bronzefor external location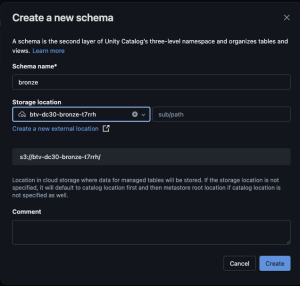
- Enter
- Repeat for silver
Terraform
Init
Variables.tf
git clone https://github.com/CptOfEvilMinions/BlogProjectscd BlogProjects/databricks-btv-dc30/terraformcp variables.tf.example variables.tfvim variables.tfand setexternal_id
Generate Databricks token
- Profile > Settings > Developer > Access tokens > Manage
- Select “Generate new token”
- Install Databricks CLI
databricks configure --token- Enter Databricks URL
- Enter user token
- Verify:
databricks current-user me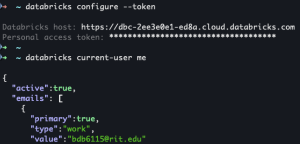
Create S3 state bucket
cd terraform/s3_state_bucketterraform initterraform apply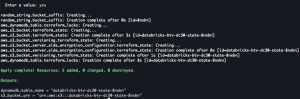
- Copy the
s3_bucket_arnanddynamodb_table_namevalues cd ..vim main.tfand updatebucketanddynamodb_table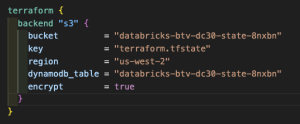
Deploy
terraform initterraform apply
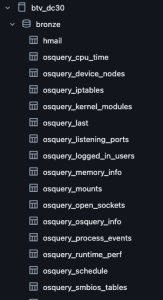
Create bronze tables
- Upload notebooks if you didn’t use Terraform
- Workspace > Home > create_bronze_tables.ipynb
- Run > Run all
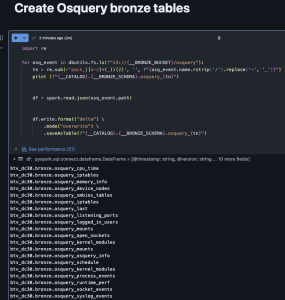
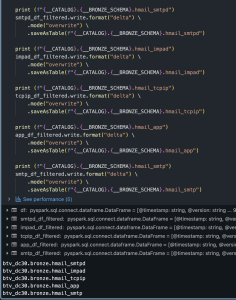
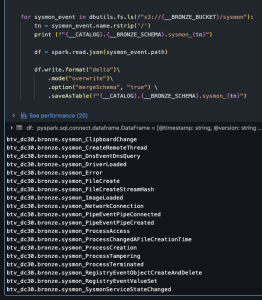

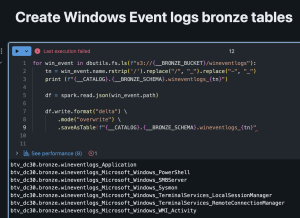
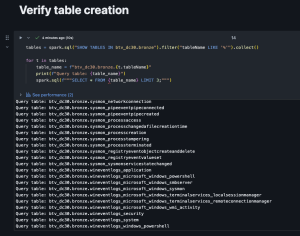
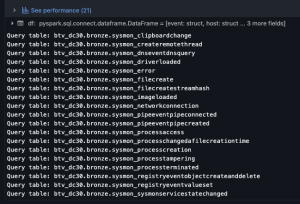
- Verify
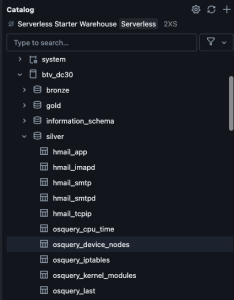
Generate silver tables with notebook
Per the Medallion model methodology, I created bronze tables using the raw logs. These tables often contain issues such as timestamps stored as strings and excessive metadata. At the silver stage, I ensured each data source has a column with a type of timestamp, I extracted key values (e.g., hostnames) from nested JSON, dropped unnecessary fields, normalized text logs where appropriate, and enforced proper data types.
- Upload notebooks if you didn’t use Terraform
- Workspace > Home >
create_silver_tables.ipynb - Run > Run all
Lessons learned
- Databricks platform
- Ingesting logs from S3/cloud storage
- Creating Delta tables
- PySpark
- Leverage PySpark for data normalization
- Terraform to create Databricks resources
Appendix
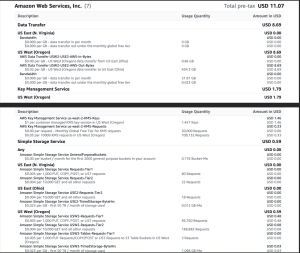
AWS costs
Below is a PDF report of my AWS costs for this blog post. This cost reflects extensive experimentation and some inefficient practices. For example, when I was writing silver tables, I wrote code to load data from S3 into a dataframe and then I had code to modify the dataframe in the same Jupyter cell. For each consecutive testing of my code, I was loading the dataset from S3. I later split the code into two cells, one to load the data and another to modify it, to reduce repeated S3 reads. I also deleted and re-uploaded the data from my local machine to S3, then reloaded it into Databricks. Thankfully, the cost incurred was relatively low, demonstrating the cost effectiveness of this technology. That being said, I was only loading megabytes of data; the story would likely be different for terabytes.
AWS IAM trust policy for Databricks roles
{
    "Version": "2012-10-17",
    "Statement": [
        {
            "Effect": "Allow",
            "Principal": {
                "AWS": [
                    "arn:aws:iam::864194629136:role/btv-dc30-databricks",
                    "arn:aws:iam::414351767826:role/unity-catalog-prod-UCMasterRole-14S5ZJVKOTYTL"
                ]
            },
            "Action": "sts:AssumeRole",
            "Condition": {
                "StringEquals": {
                    "sts:ExternalId": "0000"
                }
            }
        }
    ]
}
AWS IAM policy for Databricks roles
{
    "Statement": [
        {
            "Action": [
                "s3:PutObject",
                "s3:ListMultipartUploadParts",
                "s3:ListBucketMultipartUploads",
                "s3:ListBucket",
                "s3:GetObject",
                "s3:GetBucketLocation",
                "s3:DeleteObject",
                "s3:AbortMultipartUpload"
            ],
            "Effect": "Allow",
            "Resource": [
                "arn:aws:s3:::btv-dc30-silver-<random prefix>/*",
                "arn:aws:s3:::btv-dc30-silver-<random prefix>",
                "arn:aws:s3:::btv-dc30-bronze-<random prefix>/*",
                "arn:aws:s3:::btv-dc30-bronze-<random prefix>"
            ]
        },
        {
            "Action": "sts:AssumeRole",
            "Effect": "Allow",
            "Resource": "arn:aws:iam::<AWS account ID>:role/btv-dc30-databricks"
        }
    ],
    "Version": "2012-10-17"
}