
In this blog post I will be walking you through how I setup my club’s CTF infrastructure on AWS. I take great pride as the RC3 CTF infrastructure captain (with a bit of an inflated ego 🙂 ) that my infrastructure as a whole never had any downtime! Additionally, our CTF attracted a 1,000 users over the course of a weekend, which was a great stress test for my infrastructure.
This post consists of the following AWS services which are EC2, S3, VPCs, Route 53, RDS, and IAM. Our infrastructure utilized software and services such as CentOS, Ubuntu, HAProxy, Let’s Encrypt, CTFd, Bro, and Nginx/uwsgi. Please keep in mind this guide is a sys admin guide and not a security guide. Some of the security measures implemented in the infrastructure have been left out of this guide to thwart individuals from taking advantage of this build in the future. Without further ado, here we go on the wild ride of creating a CTF cloud computing infrastructure in Amazon’s Web Services (AWS) :).
DISCLAIMER
It has been over six months since I have done this project. This guide should NOT BE used forbetum because I have not included our entire setup. Additionally, as we moved closer to the event I stopped documenting things and just got things running. For the most part this guide provides a very GOOD overview of how to setup a CTF infrastructure in AWS.
Infrastructure Layout

AWS Services
- Elastic Cloud Computing(EC2) – EC2 is a web service that provides resizable compute capacity in the cloud.
- Route53 – Route 53 is a highly available and scalable cloud Domain Name System (DNS) web service
- Simple Storage Service(S3) – S3 is storage for the Internet. It is designed to make web-scale computing easier for developers
- Virtual Private Cloud(VPC) – A VPC lets you provision a logically isolated section of the Amazon Web Services (AWS) cloud where you can launch AWS resources in a virtual network that you define. You have complete control over your virtual networking environment, including selection of your own IP address range, creation of subnets, and configuration of route tables and network gateways.
- Relational Database Service(RDS) – RDS makes it easy to set up, operate, and scale a relational database in the cloud.
- Identity and Access Management(IAM) – IAM enables you to securely control access to AWS services and resources for your users. Using IAM, you can create and manage AWS users and groups, and use permissions to allow and deny their access to AWS resources.
Infrastructure Build
AWS Services Setup
Identity and Access Management(IAM)
Access to your AWS management console for your infrastructure is one of the most important things to secure! Our infrastructure had multiple e-board members working on it and they all needed access. IAM gives the ability to create multiple users, groups, and provide granular permissions to each. As the AWS sys admin you should know how to set proper permissions and know who has permissions to do certain actions. As a warning DO NOT work from the AWS root account there is NO NEED! Also enable two factor on root and admin accounts.
- Login into the AWS management console
- Select “IAM” under “Security & Identity”
- Select “Customize” under “IAM users sign-in link:”
- This will allow you to create a login portal for just your AWS management console.
- This customized link is the ink you give all your IAM users

- The root account will access the link provided in step number 1.
- Select “Groups” then select “Create a new group”
- Admin group
- Enter a name for the group
- Select “Administrator Access”, next step

- Select “Create group”
- Billing group
- Enter a name for the group
- Select “Billing”, next step

- Select “Create group”
- Admin group
- Return to the IAM dashboard
- Select “Users” then select “Add user”
- Admin users
- Enter a username for user name
- Select “AWS Management Console” for Access Type
- Select “Autogenerated password” for console password
- Select “User must create a new password at next sign-in”

- Select “Add users to group” from
- Select admin group

- Select “Create user”
- Billing Group
- Enter a username for user name
- Select “AWS Management Console” for Access Type
- Select “Autogenerated password” for console password
- Select “User must create a new password at next sign-in”
- Select “Add users to group” from
- Select billing group
- Select “Create user”
- Admin users
Namecheap and Route 53
My club, RC3, currently owns the following domain “rc3.club” on Namecheap’s fantastic DNS service. However, we needed to control the subdomain “ctf.rc3.club” from AWS’s Route 53 service. I found out that we could create a subdomain on Namecheap and point all NS records for that subdomain at Route 53’s nameservers! This made managing DNS for “ctf.rc3.club” a thousand times easier and the time to propagate new records was minimial. Additionally, once we had Namecheap pointing at Route 53 for our subdomain we created a hosted zone. Once the zone was created we could create A records, CNAMES records and any additional DNS records needed. Once we had DNS setup we could host a website for our event on ctf.rc3.club.
- Login into your Namecheap account or your nameserver provider
- The following instructions are for Namecheap but should be fairly similar with other providers
- Select “Manage” for the domain you wish to add a subdomain too
- Select “Advance DNS” under your domain
- Select “Add new record”
- Select “NS Record” for type
- Enter “ctf” for host
- This is where you enter your subdomain but I choose ctf.
- Enter “ns-1220.awsdns-24.org” into nameserver
- Repeat steps above with the following nameservers
- ns-467.awsdns-58.com.
- ns-1644.awsdns-13.co.uk.
- ns-544.awsdns-04.net.
- Select “Save all changes”

Setup an e-mail catcher
Namecheap has an awesome feature for e-mail called “catch-all”. We currently have a Gmail account for our club but I wanted a separate e-mail for the CTF event. The “catch-all” feature allows you to catch certain e-mail aliases to redirect them to certain e-mails or use a wildcard to catch all e-mails to a particular e-mail account. I decided to be lazy and setup a wildcard catch-all rule for our domain and provide CTF partipants with [email protected] for the event.
- Select “Domain” under your domain
- Scroll down to the “Redirect Mail” section
- Select “Add catch-all”
- You can setup a forwarder for a specific e-mail alias but we want all e-mails to go to one account
- Enter a valid e-mail address into the “forward to”
- Select the check mark to save the settings.
Simple Storage Service and static page
By this point in the article you know we don’t have an infrastructure set up so we didn’t have anywhere to host our website. However, we wanted to post on CTFtime about our event to have people sign-up but we didn’t have a landing for our event. AWS S3 has this great feature that allows you to host static websites. We went forward with creating a static webpage for our event which included all the information about the event and a sign-up link for a Mailchimp event subscriber list.
Mailchimp
- Create an account on Mailchimp
- Why, because it’s free and easy, if your infrastructure isn’t up yet!
- Login select “Lists” and then select “Create lists”.
- Enter pertinent information for your e-mailing list as seen below.

- Select “Create a signup form” and then select “General form” for form type.
- Add all details you would like to collect from the user for this form.
Setup S3 Bucket for static pate
- Login into your AWS management console and select “S3” under “Storage and Content Delivery”.
- Select “Create Bucket” for the name of the S3 bucket should be the name of subdomain(ctf.rc3.club)
- Upload all files pertaining to the static webpage.
- Check all the files and select “Make Public” under “Actions”.
- In the top right select “properties” and expand the “Enable website hosting” section.
- Enter “index.html” for Index document
- Enter “error.html” for error document.

- Now as you can see above in the photo the endpoint is the weblink to get to static webpage.
- But that link is gross and we want to point “ctf.rc3.club” at our static webpage and we can with the power of Route 53.
- Go to Route 53 and select your hosted zone for for your domain, mine is “ctf.rc3.club”.
- Select “Create Record Set” and set the record type to “A”.
- Select “yes” for “alias”, then click inside alias target and a drop down will appear and select “ctf.rc3.club” under S3 website endpoints.
- Select “Save Record Set” at the bottom to make your domain point at the static webpage.

Virtual Private Cloud Setup
This is where things become fun and spicy woot woot! Before continuing to read this section please familiarize yourself with the infrastructure layout above so that it makes sense when building. This infrastructure has multiple subnets in the VPC which are public, infra, pwn, web, and misc. So for example if a web challenge needed an EC2 instance we would put that EC2 instance into the web subnet within the VPC. The reason for this is to control each digital environment for a category of challenges so that if someone gained access to the box they couldn’t attack all boxes within the VPC, only the boxes within the subnet. Additionally, this allows us to setup Bro to monitor traffic and look for anomalies in the traffic.
VPC Setup
- Select “VPC” under Networking
- Select “Elastic IPs” on the left
- Select “Allocate new address”
- Select “Allocate”
- Select “Start VPC Wizard”
- Select “VPC with Public and Private subnets”
- Enter “192.168.0.0/16” into IP CIDR Block
- Enter “rc3CTFvpc” for VPC name
- Enter “192.168.0.0/24” for the public subnet
- Select “No preference” for availability zone
- Unless you need to 🙂
- Enter “rc3PUBLICsubbet” for subnet name
- Enter “192.168.10.0/24” for private infrastructure subnet
- Select “No preference” for availability zone
- Enter “rc3INFRAsubnet” for private subnet name
- Click in Elastic IP Allocation ID and select the newly created Elastic IP
- Select “Create VPC”

- Select “Subnets” on the left
- Repeat these steps for pwn, and misc.
- Select “Create subnet”
- Enter “rc3WEBsubnet” for name
- Select “(192.168.0.0/16)rc3CTFvpc”
- Select “no preference” for availability zone
- Enter “192.168.20.0/24” for CIDR block
- Select “Yes” to create

Create Internet Gateway
- Select “Internet Gateway” on the left inside the VPC section
- Select “Create an internet gateway” at the top
- Enter a name for name tag, select, select “create”
- Select the newly created internet gateway and select “Attach to VPC” at the top
- Select “rc3CTFvpc” for VPC
- Select “Attach”
Create NAT Gateway
- Select “NAT gateway” on the left inside the VPC section
- Select “Create a NAT gateway” at the top
- Select “rc3INFRAsubet” for subnet
- Select “Create new EIP”
- Select “Create a NAT Gateway”
CTF Infrastructure Setup
HAproxy
HAproxy actually stands for high availability proxy and is a layer 4 and above aware proxy for the networking OSI model. Meaning HAproxy has the ability to handle TCP/HTTP load balancing, acts as a gate keeper to our infrastructure, does SSL termination, and provides port forwarding for ingress and egress traffic for our VPC.
Assign Public IP to HAProxy
- Create an AWS EC2 instance connected to “rc3PUBLICsubnet” within “rc3CTFvpc”
- Within the EC2 menu select “Elastic IPs” on the left under “Network and Security”
- Select “Allocate New Address” at the top
- Enter “rc3CTFhaproxy1” for instance and select “associate”
Setup Route 53 DNS
If you have a static webpage setup you may wish to skip this part until CTFd is setup.
- Login into AWS Management console
- Select “Route 53” under Networking
- Select “ctf.rc3.club” hosted zone
- Select “Create Record Set”
- Enter “” into name
- Ignore “scoreboard” in the picture below
- Select “A -IPv4” for Type
- Select “No” for Alias
- Enter “<IP address of HAproxy1>” for value

- Select “Save record set”
- Enter “” into name
- Select “Create Record Set”
- Enter “www” into name
- Select “CNAME” for Type
- Select “No” for Alias
- Enter “ctf.rc3.club” for value
- Select “Save record set”

Install/Setup Let’s Encrypt and domain certs
- Login into HAproxy1
- Yum update -y
- yum upgrade -y
- yum install vim net-tools -y
- yum install epel-release
- yum install certbot
- certbot certonly -d ctf.rc3.club -d www.ctf.rc3.club


- mkdir /etc/haproxy/certs
- DOMAIN=’ctf.rc3.club’
sudo -E bash -c 'cat /etc/letsencrypt/live/$DOMAIN/fullchain.pem /etc/letsencrypt/live/$DOMAIN/privkey.pem > /etc/haproxy/certs/$DOMAIN.pem'
Install/Setup HAProxy
- sudo -i
- setenforce 0
- yum install -y haproxy
- cp /etc/haproxy/haproxy.cfg /etc/haproxy/haproxy.cfg.bak
 cat > /etc/haproxy/haproxy.cfg << 'EOF'

global

log 127.0.0.1 local2

chroot /var/lib/haproxy

pidfile /var/run/haproxy.pid

maxconn 4000

user haproxy

group haproxy

daemon

stats socket /var/lib/haproxy/stats

defaults

log global

option dontlognull

timeout connect 10s

timeout client 1m

timeout server 1m

maxconn 3000# --- CTFd proxy ---

frontend www-https

mode http

option httplog

bind 0.0.0.0:80

bind 0.0.0.0:443 ssl crt /etc/haproxy/certs/

redirect scheme https code 301 if !{ ssl_fc }

acl letsencrypt-request path_beg -i /.well-known/acme-challenge/

use_backend ctfd-scoringengine if letsencrypt-request

default_backend ctfd-scoringengine

backend ctfd-scoringengine

mode http

balance roundrobin

option httplog

option httpchk HEAD / HTTP/1.0

server  ; check fall 3 rise 2

server  ; check fall 3 rise 2# --- Web 100 SSH ---

listen web100_ssh

mode tcp

option tcplog

bind 0.0.0.0:2222

server

timeout client 1h

timeout server 1h# --- Web 100 ---

listen web100

mode http

option httplog

bind 0.0.0.0:3000

server

timeout client 1h

timeout server 1h
- systemctl enable haproxy
- systemctl start haproxy
Rational Database Setup(MariaDB)
- Select “RDS” under database
- Select “Get started now”
- Select “MariaDB” then “Select”
- Select “MariaDB” under “Production”
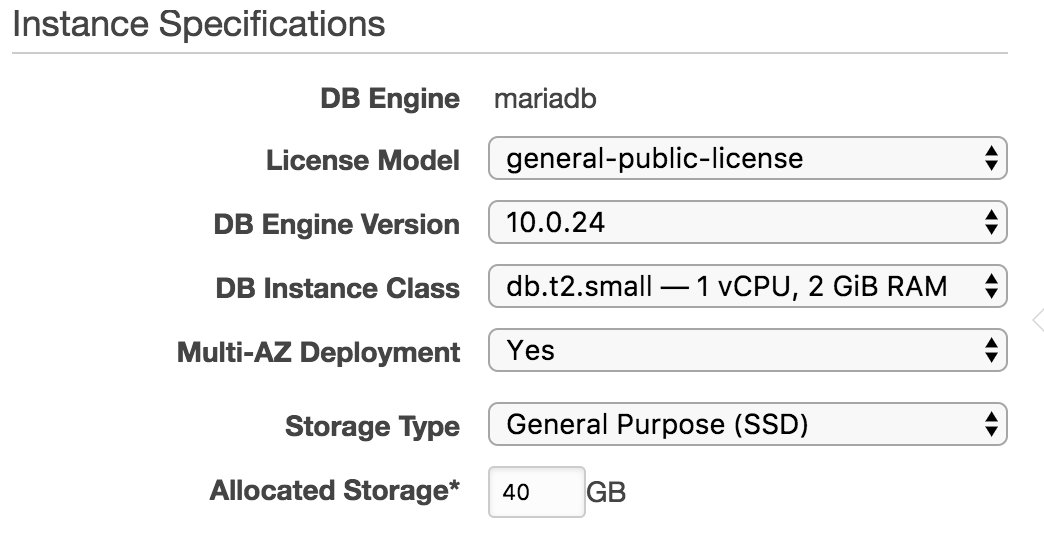
- Select “general-public-license” for license model
- Select “10.0.24” for DB Engine Version
- Select “db.t2.small” for DB instance class
- Select “Yes” for Multi-AZ deployment
- Select “General purpose SSD” for storage type
- Enter “40” for Allocated Storage
- Enter “rc3CTFmariadb” for Instance identifier
- Enter “superadminDB” for username
- Enter password
- Select “rc3CTFvpc” for VPC
- Select “Create a new DB subnet group” for subnet group
- Select ‘NO” for publically accessible
- Select “Create a new security group” for VPC security groups
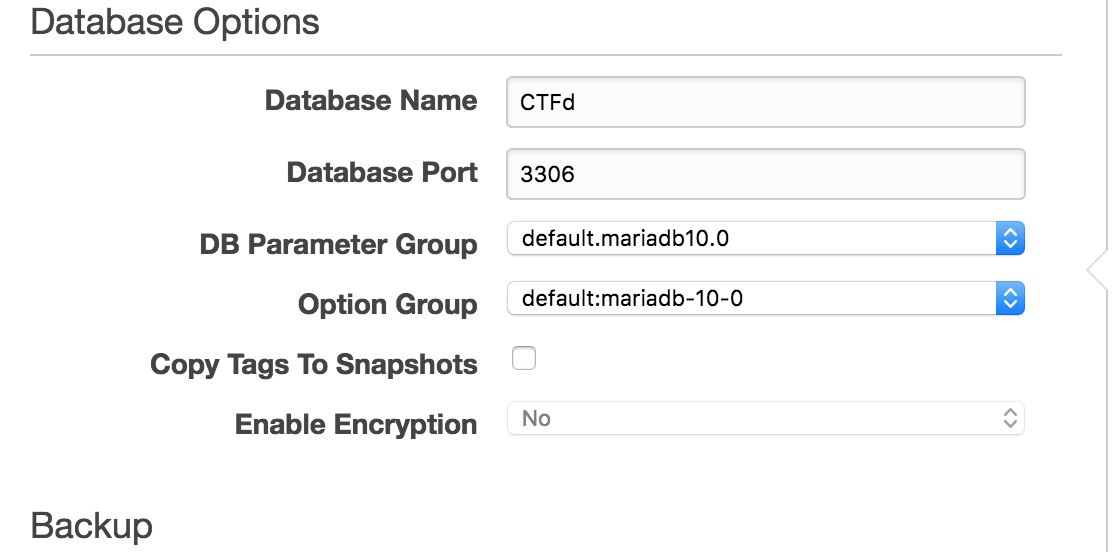
- Enter “CTFd” for database name
- Enter “3306” for database port
- Select “default.mariadb10.0” for DB parameter Group
- Select “default:mariadb-10-0” for option group
- Select “7” days for backup retention period
- How long backups are kept
- Select “No preferences” for backup windows
- Select “yes” for enabled enhanced monitoring
- Select “default” for monitoring role
- Select “60” for granularity
- Select “NO” for auto minor version upgrades
- Select “Launch DB instance”


- Go to “RDS” under databases
- Select “Instances” on the left
- Expand the “rc3ctfmariadb” MariaDB instance
- Select security group for the DB instance
- Select “Inbound” tab and select “edit”
- Select all thes current rules and delete them
- Select “Add rule”
- Set “MySQL/Aurora” for type, “TCP” for protocol, “3306” for port, and enter “192.168.10.0/24” for Source
- 192.168.10.0/24 is the rc3INFRAsubnet
- Save

- REPEAT THE SAME FOR OUTBOUND
- Login into mysql instance
- CREATE USER ‘<ctfd user>’@’192.168.10.%’ IDENTIFIED BY ‘<PASSWORD>’;
- 192.168.10.0 is the rc3INFRAsubnet
- GRANT INSERT,SELECT,UPDATE,DELETE ON CTFd.* TO ‘<ctfd user>’@’192.168.10.%’;
- FLUSH PRIVILEGES;
- exit;
Install/Setup CTFd + Nginx + uwsgi + Let’s Encrypt
- Select “Create new instance”
- Enter “CentOS 7” into AWS marketplace for AMI
- Select “CentOS 7 (x86_64) – with Updates HVM”
- Select “t2.medium” for instance type
- Select “(192.168.0.0/16)rc3CTFvpc” for network
- Select “(192.168.10.0/26)rc3INFRAsubet for subnet
- Check “Enable termination protection”
- Enter “40” for GiB
- Select “General purpose SSD” for volume type
- Enter “rc3CTFDbox1” for value
- Add SSH inbound rule via 22 from your IP
- Add HTTP inbound via HTTP from 0.0.0.0/0
- Launch Instance

Install/Setup CTFd + uwsgi
-
- yum update && yum upgrade -y
- yum install epel-release -y
- yum install nginx vim libffi-devel mariadb-devel -y
- yum install python-pip python-devel gcc git -y
- yum install mysql -y
- pip install MySQL-python
- cd /opt
- git clone https://github.com/isislab/CTFd.git
- mv RC3_CTFD/ CTFd
- cd CTFd/
- pip install -r requirements.txt
- pip install uwsgi
- chown nginx:nginx -R /opt/CTFd
cat > /opt/CTFd/ctfd.ini << 'EOF'
[uwsgi]
# Where you've put CTFD
chdir = /opt/CTFd
# If SCRIPT_ROOT is not /
#mount = /ctf=wsgi.py
# SCRIPT_ROOT is /
mount = /=wsgi.py
# You shouldn't need to change anything past here
plugin = python
module = wsgi
master = true
processes = 1
threads = 1
vacuum = true
manage-script-name = true
wsgi-file = wsgi.py
callable = app
die-on-term = true
# If you're not on debian/ubuntu, replace with uid/gid of web user
uid = nginx
gid = nginx
EOF
-
-
- vim /opt/CTFd/CTFd/config.py
- Set to ‘SQLALCHEMY_DATABASE_URI = “mysql://<username>:<password>@<hostname>/<database name>”’
- save,exit
- vim /opt/CTFd/CTFd/config.py
-
Setup SystemD process
-
-
cat > /etc/systemd/system/ctfd.service << EOF
-
[Unit]
Description=uWSGI instance to serve myproject
After=network.target
[Service]
User=nginx
Group=nginx
WorkingDirectory=/opt/CTFd
#Only use IF you setup virtualenv
#Environment="PATH=/home/user/myproject/myprojectenv/bin"
ExecStart=/bin/uwsgi -s /opt/CTFd/uwsgi.sock -w 'CTFd:create_app()'
[Install]
WantedBy=multi-user.target
EOF
-
-
-
- systemctl enable ctfd.service
- systemctl start ctfd.service
- systemctl status ctfd.service
-
-
Install/Setup Nginx
-
-
-
- vim /etc/nginx/nginx.conf
-
- Add
user nginx;

worker_processes auto;

error_log /var/log/nginx/error.log;

pid /run/nginx.pid;
# Load dynamic modules. See /usr/share/nginx/README.dynamic.
include /usr/share/nginx/modules/*.conf;events {
worker_connections 1024;
}http {
log_format main '$remote_addr - $remote_user [$time_local] "$request" '
'$status $body_bytes_sent "$http_referer" '
'"$http_user_agent" "$http_x_forwarded_for"';access_log /var/log/nginx/access.log main;
sendfile on;
tcp_nopush on;
tcp_nodelay on;
keepalive_timeout 65;
types_hash_max_size 2048;include /etc/nginx/mime.types;
default_type application/octet-stream;
# Load modular configuration files from the /etc/nginx/conf.d directory.
# See http://nginx.org/en/docs/ngx_core_module.html#include for more information.
include /etc/nginx/conf.d/*.conf;
-
- save,exit
cat > /etc/nginx/conf.d/ctfd.conf << 'EOF'
- vim /etc/nginx/nginx.conf
-
-
 server {

listen 80;

location / {

include uwsgi_params;

uwsgi_pass unix:/opt/CTFd/uwsgi.sock;

}

}

EOF
Install/Setup SELinux + Nginx(with uwsgi)
-
-
-
- yum install policycoreutils -y
- systemctl enable nginx
- systemctl start nginx
- curl localhost
- It will fail but that is needed for the next step
- grep nginx /var/log/audit/audit.log | audit2allow -M nginx
- semodule -i nginx.pp
- curl locahost
- Should return the login page for CTFd
-
-
Setup NTP
-
-
-
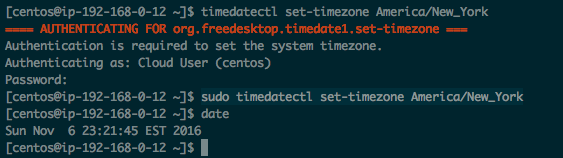
- yum install ntp
- sudo timedatectl set-timezone America/New_York
- date
- To confirm
- To confirm
-
-
Setup CTFd
-
-
-
- Browse to CTFd engine
- Enter “<name of CTF>” for CTF Name
- Enter “<admin username>” for admin username
- Enter “<e-mail>” for admin e-mail
- Enter “<password>” for ctf password
- Select “Click here to setup your CTFd”
- Select “Admin” menu in the top right then “config”
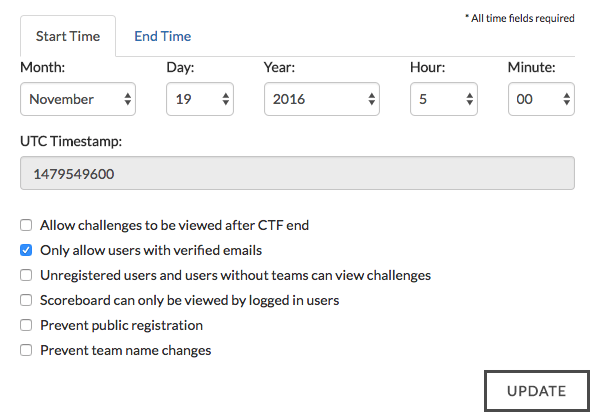
- Check “Only users with verified emails
- Select “update”
-
- Select “Admin” menu in the top right then “config”
- Go to the time section
- Enter start time
- Friday November 18th 9pm
- Enter end time
- Sunday November 20th 11;59pm
- Select “Update”
- Select “Admin” menu in the top right then “config”
-
-
Setup Bro collector on HAProxy
Setup EBS Volume collection bin
-
-
-
- Select “EC2” under “Compute”
- Select “Volumes” on the left
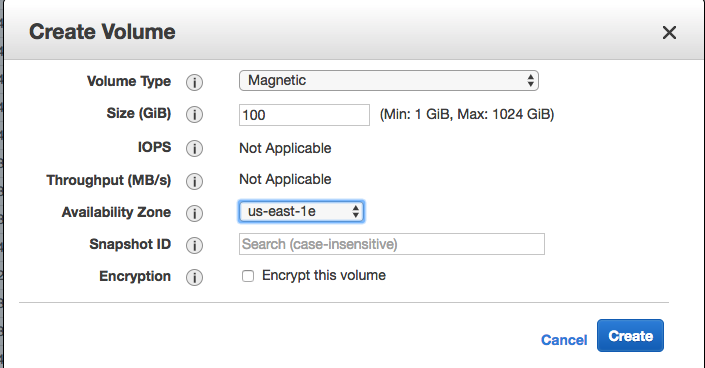
- Select “Create volume”
- Select “Magnetic” for volume type
- Enter “100” for Size Gib
- Select “us-east-1e” for availability zone
- Select availability zone of haproxy1
-
- Select “Create”
- Select “Create”
-
- Select newly created volume
- Go to Actions and then select “Attach volume”
- Enter “haproxy” for instance and hit attach
-
-
Format and mount drive on HAproxy
-
-
-
- Login into HAproxy1 via ssh
- Fdisk -l to list all drives
-
-

-
-
-
- mkfs.ext4 <drive location>
- Current one is /dev/xvdf
- mkdir /media/dataDisk
- Mkdir /media/dataDisk/BroSpool
- Mount /dev/xvdf /media/dataDisk
- Echo “/dev/xvdf /media/dataDisk ext4 defaults 0 2” >> /etc/fstab
- mkfs.ext4 <drive location>
-
-
Install/Setup Bro
-
-
-
- yum install cmake make gcc gcc-c++ flex bison libpcap-devel openssl-devel python-devel swig zlib-devel -y
- cd /opt
- git clone –recursive git://git.bro.org/bro
- cd bro/
- ./configure
- make
- make install
- export PATH=/usr/local/bro/bin:$PATH
- broctl install
- broctl start
- systemctl enable crond
- systemctl start crond
- echo “0-59/5 * * * * /usr/local/bro/bin/broctl cron” >> /etc/crontab
- mkdir /media/dataDisk/BroLogs
- sed -i ‘s#LogDir = /usr/local/bro/logs#LogDir = /media/dataDisk/BroLogs#g’ /usr/local/bro/etc/broctl.cfg
- sed -i ‘s#SpoolDir = /usr/local/bro/spool#SpoolDir = /media/dataDisk/BroSpool#g’ /usr/local/bro/etc/broctl.cfg
- echo “0.0.0.0/0” >> /usr/local/bro/etc/networks.cfg
-
-
Post mortem and lessons learned
Explaining AWS load balancers are only for HTTP/S
For those who are unaware HTTP is a stateless protocol meaning it’s a simple question and answer system. The webserver treats each request as an independent question and doesn’t keep track of information, status, or a session ID about the connection. The AWS Load Balancers work off of this stateless protocol so it will not support TCP stateful protocols like SSH. For instance, an SSH server keeps track of information, status, and a session ID for each connection. PLEASE DO NOT try and use an AWS load balancer like HAproxy to act as your frontend for the VPC.
VPCs are only layer 3 aware
I learned this one the hard way so hopefully I can clear up any misconceptions. From the documentation about AWS VPCs it seems as if they are layer 4 aware. For those unaware, layer 4 of the OSI model is the part of the stack that keeps track of protocol type, ports, and sessions. Therefore you are not able to use a VPC as a port forwarding mechanism. HAproxy is layer 4 and above aware, therefore it is your best bet for port forwarding mechanism.
Plan for the worse
No infrastructure is perfect so plan for the worse! Always have redundant systems ready to go just incase things go down. For example, we had a second HAproxy running idle just incase HAproxy1 went down. If it went down I would set the DNS record to HAproxy2, analyze HAProxy1 and hopefully bring it back up.
Take SNAPSHOTS OF everything you do!!!! Take snapshots as often as you take a sip of coffee, something will break and it’s often easier to revert back to a working point and make changes then diagnosing an issue.
Always put challenges behind nginx and wsgi
PLEASE PLEASE PLEASE PLEASE for the love of all things good put web challenges behind nginx!!!! For our competition we had several flask application for challenges and flask is not designed to handle hundreds of users and dirbuster attacks all at once. At the very least have the flask app listen on 127.0.0.1 on port 5000 and setup Nginx as a reverse proxy to the local flask app. For the first hour of our competition we had e-board literally restarting the flask apps because they kept going down. To initially stop the bleeding I set each flask app behind Nginx set up as a reverse proxy. Then I went around around and put connection limits and requests per second limits on all Nginx servers to thwart dirbuster scans. Finally, I went around to each flask app and setup uwsgi+Nginx to handle the load efficiently. As a final note I personally prefer Nginx over Apache but the same principal applies here.
Thoughts for next year
-
-
-
- Use a Docker swarm
- Docker containers are cheaper then Ec2 instances
- Docker swarm provides load balancing
- Docker swarm also provides scaling of containers. Meaning if one container dies there are other to handle the load.
- Use a Docker swarm
-
-
Resources/Sources
-
-
-
- http://docs.aws.amazon.com/Route53/latest/DeveloperGuide/CreatingNewSubdomain.html
- http://docs.aws.amazon.com/AmazonVPC/latest/UserGuide/VPC_Subnets.html
- https://www.youtube.com/watch?v=TlHZBlRpXyU
- https://www.howtoforge.com/tutorial/how-to-setup-haproxy-as-load-balancer-for-nginx-on-centos-7/
- https://www.digitalocean.com/community/tutorials/how-to-secure-nginx-with-let-s-encrypt-on-centos-7
- https://www.digitalocean.com/community/tutorials/how-to-secure-haproxy-with-let-s-encrypt-on-ubuntu-14-04
- https://www.digitalocean.com/community/tutorials/how-to-serve-flask-applications-with-uwsgi-and-nginx-on-centos-7
- https://github.com/isislab/CTFd
- https://github.com/isislab/CTFd/wiki/Deployment
- https://chriswarrick.com/blog/2016/02/10/deploying-python-web-apps-with-nginx-and-uwsgi-emperor/
- http://axilleas.me/en/blog/2013/selinux-policy-for-nginx-and-gitlab-unix-socket-in-fedora-19/
- http://www.cyberciti.biz/faq/howto-format-create-linux-filesystem/
-
-